Additional custom layout formats can be developed using XSLT - please contact us
for more information if this is of interest to you.
ExpPrint allows you to easily view, print, and save comprehensive listings of files from any file store accessible through Windows Explorer (including local & networked disks, SharePoint libraries, and cloud storage systems).
You can create HTML, CSV (comma-separated values) text, or plain text listings in a detailed table format with an extensive choice of file system and metadata properties. Alternatively, you can create a concise multi-column HTML layout showing just the file and folder names.
Detailed listings can be sorted by any property (name, size, type, date, version, etc.), and are highly configurable in both content and presentation style. You can create your own custom settings and save as many as you want.
You can create listings containing:
Listings can include the following file information:
Additionally, many other properties (tags/metadata) for any media or document file type supported by Windows can be listed. Here's a brief selection:
| Media/General | Audio | Music | Video | Photos | Document |
|---|---|---|---|---|---|
|
Version Duration Year Encoding Date Subtitle |
Bit Rate Sample Rate |
Album Title Artist Track number Beats per minute |
Director Frame width & height |
Tags/Comments Date Taken Focal Length 'F' Number ISO People names Dimensions |
Date Saved Author Word Count Revision Version |
|
If there's a specific property you need and aren't sure if it's supported, just email us and ask. |
|||||
ExpPrint can also identify hard linked files, and where there is more than 1 occurrence of the same linked file in a listing, eliminate the duplicate's size from the folder size value.
ExpPrint uses XML data formats and can be customized by anyone familiar with CSS and XSLT web technologies. Additionally, if you have special requirements, custom plug-in viewer extensions can be written in a .NET programming language (C#, Visual Basic, etc.).
If you'd like to customize the appearance in some way, but don't feel able to do it yourself, let us know what you'd like to do and we'll try to help you. If your suggestions are generally useful we'll try to incorporate them in future versions.
Expand the zip file to a directory on your machine and run the setup program. If you've not got some of the necessary components installed, the installation should prompt you to download and install them. Once these are installed, the ExpPrint installation will continue.
Follow the on-screen instructions to complete the installation.
The last step of Setup informs you that ExpPrint is installed and briefly tells you how to use it.
If you're upgrading an existing version, you should log off and back on again to ensure that Windows Explorer has unloaded the previous version. If you don't, you may be surprised to find that you still have the previous version when you start it.
If you get the following warning running Setup:
"Windows protected your PC
Windows SmartScreen prevented an unrecognized app from starting. Running this app may put your PC at risk."
You can either:
If an administrator applies the EnforceShellExtensionSecurity policy to limit the use of shell extensions to approved ones, they will need to add ExpPrint to that list in the registry:
Create a REG_SZ value whose name is "{81A64FE0-7101-11cf-8731-444553540000}" under the HKLM\Software\Microsoft\Windows\CurrentVersion\Shell Extensions\Approved branch.
The installer supports the MSI administrative installation options.
For example:
msiexec /jm expprint.msi
"Advertises" ExpPrint on all the machine's users Programs menu items. When a user invokes the Start->Programs->JD Design->ExpPrint->ExpPrint Documentation option, the installation of ExpPrint will complete.
or:
msiexec /a expprint.msi
Performs an "administrative" installation to a shared network location.
ExpPrint setup installs files to the following directories:
| Path | Usage |
|---|---|
| %ProgramFiles%\JD Design\ExpPrint |
The main installation directory Contains the core program files |
| ...\Plugins |
The plug-in's directory Contains the viewer plug-in components, and the XSLT and CSS style sheets |
| ...\doc |
The documentation directory Contains this document and related image files |
Setup will also add relevant registry entries and Start menu items.
Any user settings for the Detailed Table formats are stored in the user's (My) Documents\ExpPrint folder.
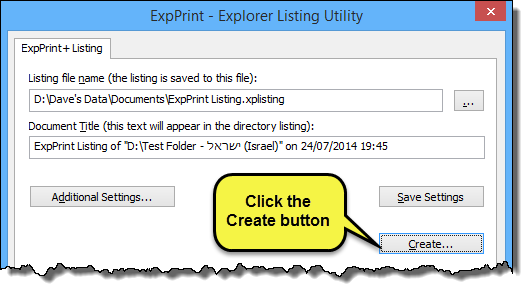
If you want to use the default options (or the last saved settings), just click the "Create..." button.
The text in the Document Title field will appear as the document title when you preview or print an HTML listing. If you want something other than the default generated title, change it before pressing the Create button.
If you want to save a listing data file (its contents are XML data), make sure that you specify a unique file name as there is no warning that an existing file will be overwritten.

ExpPrint can calculate hash values for file contents using several popular algorithms: Crc32, MD2, MD4, MD5, SHA‑1, SHA‑256, SHA‑384, and SHA‑512.
Hash values are commonly used for file verification purposes - you may encounter their use as a means of checking that downloaded files haven't been corrupted.
Note that ExpPrint has to read each file in full to calculate these values. Using these options can greatly slow down the listing generation, particularly when the file is large and/or if the file is on slow networked or cloud storage.
With this option set, ExpPrint asks Windows to obtain as many properties as possible. In some situations this can be noticeably slower than without it, though for most local disks the speed difference is relatively small. We recommend that you use this option unless the data collection proves to be very slow. Although results vary when this option is not set, we've generally observed that the Owner property and some document and image properties may be missing - though this varies by the type of file and its location.
Note: With this option off, only the core GPS property metadata (latitude, longitude, altitude) may be extracted from photos. If you want to use the facility to include map links for your photos, you will likely need to set this option on.
With this option set, ExpPrint will list the contents of any non-protected compressed folders (zip or cab files).
If you set this option, ExpPrint will follow any symbolic links to other folders.
If a file has multiple links, ExpPrint records the first occurrence it encounters as being the source, and any subsequent ones as links.
Include the Hard Links Path column in the Detailed Table Options dialog to show the hard link files, and for HTML listings, try the Hard Link styles to experiment with the presentation of hard linked file items.
Limits the folder recursion depth for the listing generation.
If you have many deeply nested folders that will take a long time to process, but are only interested in the top levels and don't require correct folder sizes, this option may greatly speed up the time to create a listing.
Beware that folder sizes will be incorrect though.
In an HTML listing, ExpPrint will identify any such affected folders by showing the total size figure prefixed with ≥, and for the skipped folders, their size column will show "Omitted".
If you leave these empty, ExpPrint will collect information on all files and folders within the scope of the folder tree you've selected.
If you want to restrict your listing to specifically named files and/or folders, enter an appropriate Include Filter. Conversely, use the Exclude Filter to exclude specifically named files and/or folders. Normal file name wildcard characters are allowed; "*" to match any number of characters and "?" to match a single character. For example, if you have the following filters:
File Include Filter: *.do*;*.xl*
File
Exclude Filter: *.dot
ExpPrint will collect all files with an extension of .do* and .xl* (i.e. Word .doc or .docx, Excel .xls or .xlsx), but will exclude Word document template files .dot.
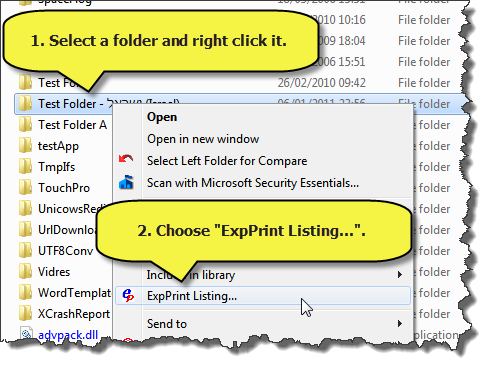
Once the listing data file has been created, the listing viewer program starts automatically with the name of the listing data file pre-populated.
|
|
|
Additional custom layout formats can be developed using XSLT - please contact us
for more information if this is of interest to you.
|
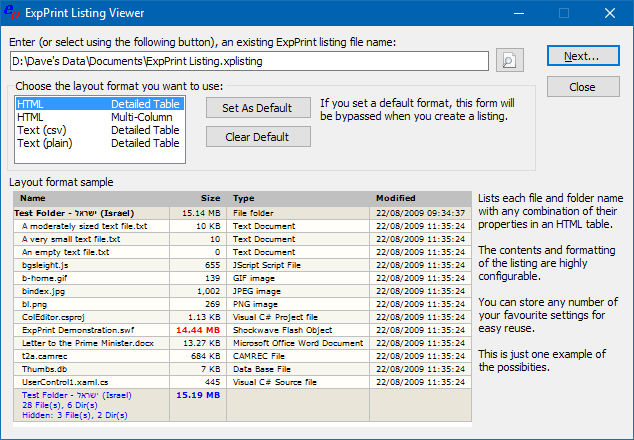
Here you can select which layout format you want to use. In an installation with no custom plug–in viewers there are 4 options:
The main viewer window displays a sample image and explanation of the type of listing that the selected layout format will produce. While the sample is a real example, it is only a static image and does not reflect the range of options that you can produce.
If you almost exclusively use one layout style, you can bypass this step by selecting the layout format in the list and using the "Set As Default" button. The next time you create a listing, this step will be skipped.
If you want to alter or clear the default layout, start the ExpPrint Listing Viewer program directly (rather than by creating a new listing) and set a new default layout, or use the "Clear Default" button.
Select the layout format you want in the list and then press the "Next..." button.
You can run the ExpPrint Viewer at any time to re-display any previously saved listing file. Start it from the Programs, JD Design, ExpPrint, ExpPrint Viewer menu item.
The layout formats produce different results:
 This produces a tabular format such as the example below:
Each row contains the name and properties of a file or folder, and optionally each folder displays summary information and the accumulated size of that folder.
This is a simple presentation of the folder and file names arranged in multiple columns as in the example here:
You can choose the number of columns.
This uses the same features as option 1, but the output is a Unicode text .csv file that you can import into another application.
The columns are separated by ',' characters, with any indenting of file/folder names by space characters.
You might find this useful if you have very large listings (where web browsers may hit their limits) and need the data importing into another application such as a spreadsheet.
This is essentially the same as the csv listing to a .txt file, but the columns are separated by tab characters and there's no quoting of the cell items.
You might find this useful if you need to import listings into a word processor and edit the text or perform specific manual formatting.
If you chose Multi-Column in the previous step, see here for the Multi-Column dialog.
If you chose one of the Detailed Table options in the previous step, you'll now see:
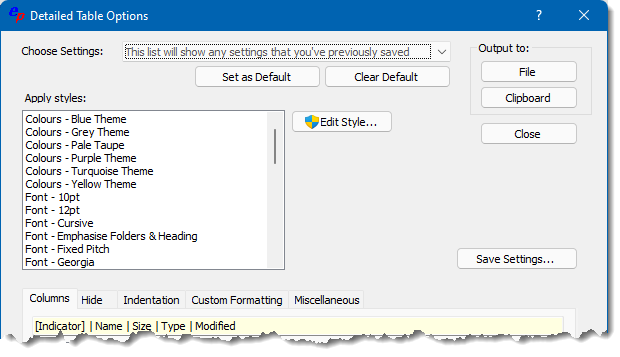
The controls on the main part of this dialog allow you to:
Note that the results from pasting HTML from the clipboard may not be identical to that shown by your web browser. For example, when pasting into Microsoft Word we've noted the following limitations:
Further options...
This page allows you to:
| Column | Description | ||||||||||||
|---|---|---|---|---|---|---|---|---|---|---|---|---|---|
|
Indicator This is only applicable in HTML listings, for text file listings it's always blank. |
Depending on which (Special Folder Indicators)
style is chosen, this column either shows graphic or text indicators of the
following types of folder:
If you don't want the indicators, don't select those styles, and/or uncheck the Indicator column. |
||||||||||||
| Name |
Normally lists the display name as you see it in Windows
Explorer. If you use the "Use Title for the Name column" option and the item has a Title property, the title is listed. If you use the "Show Full Path Name for" options on the "Miscellaneous" page, the full path name is used. |
||||||||||||
| Hard Link Path | If you used the "Identify hard linked files" option in the Additional Settings dialog when you generated the listing data file, this option will show the full path/name of what ExpPrint determined to be the originator linked file. For HTML listings, the Hard Links styles provide several options to identify source/link aspects of hard linked files. | ||||||||||||
| Size |
|
||||||||||||
| Type | The type of file or folder as you see it in Windows Explorer. | ||||||||||||
| Modified Created Accessed |
The file system timestamp values. | ||||||||||||
| Owner | The file owner. Note that if ExpPrint cannot determine an account name, it does not list the SID format as Explorer does since these are not useful to most users and would widen the column, adversely affecting the listing layout. | ||||||||||||
| Attributes |
The file or folder attributes such as
read-only, system, hidden, etc. There are 2 Attributes columns, the first is the single letter version: R H, etc. These use the same letters as the command line ATTRIB command. The second is a friendly name such as: Read-only, Hidden |
||||||||||||
| Version | The version number for .exe, .dll, and similar files. | ||||||||||||
|
Crc32, MD2, MD4, MD5, SHA-1, SHA-256, SHA-384, SHA-512 |
Hash algorithm values - commonly used for file content verification purposes. | ||||||||||||
| Tags/metadata Properties | Many different properties that are embedded in different types of files. Hopefully their names will be self-evident. |
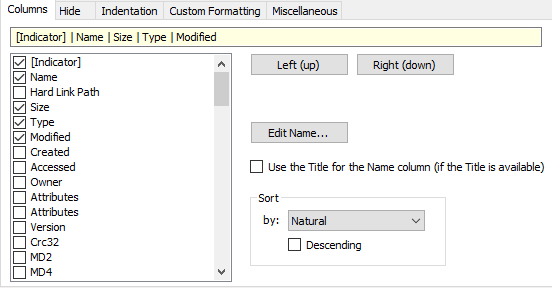
 You can choose which columns are output in a listing by setting the check box for the
column. You need to click an item in the list once to select it, then a second
time to
toggle the check box state.
You can choose which columns are output in a listing by setting the check box for the
column. You need to click an item in the list once to select it, then a second
time to
toggle the check box state.
If you right click on the columns list a context menu presents all the default columns and allows you to remove and restore the columns displayed in the list for a less verbose list.
Note that property/column names shown in the columns list are categorised for the type of file (Photo, Music, Document, etc.). System properties do not show a category prefix in the list box.
Select the column item in the list, then use the Left (up)/Right (down) buttons to position it in the order you want. You can see the horizontal order from the yellow row above the column list.
Initial sorting by file name (using Windows Explorer natural sort order) is performed during the listing generation so that listings are sorted by name the same way that Windows Explorer shows them by default. This is the "Natural" setting in the Sort by list.
You can additionally sort the listing by any available property by selecting the property column name in the Sort by list.
Note that sorting is independent of which properties are included in the listing output. So, for example, although you might not want to see the "Type" column, you can still sort by it.
The sort order is ascending unless you set the "Descending" check box.
If you want an alphabetic sort order of file names (rather than the "natural" sort order), select "Name" in the Sort by list.
You can change the listed column heading text by selecting the column name in the list, and pressing the "Edit Name..." button.
There are 3 image dimensions properties: "Image: Dimensions", "Image: Horiz. Size", and "Image: Vert. Size".
"Image: Dimensions" is a string, shown as: "NNN x MMM", where NNN is the horizontal size, and MMM is the vertical size. The other image size properties are numerical values.
If you want to list the dimensions you'll probably want to have just the "Image: Dimensions" property listed - however, you many want to sort the listing by one of the other size value - you don't need to list a property to be able to sort by it.
There are many properties for photographic image files, as well as other media and document files. If there are any you'd like to have listed that currently aren't available through ExpPrint, please send us an email and explain what it is you're looking for and include a little bit of background information to put your request into perspective.
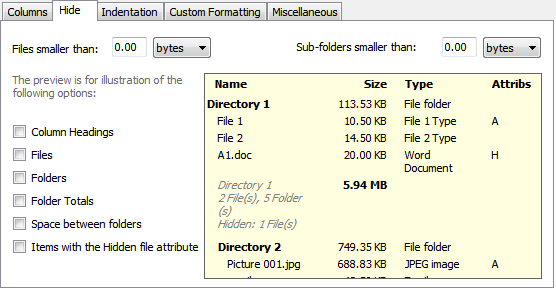
This page allows you to filter the listing by hiding:
The preview panel on the dialog shows the result of each option as you check them.
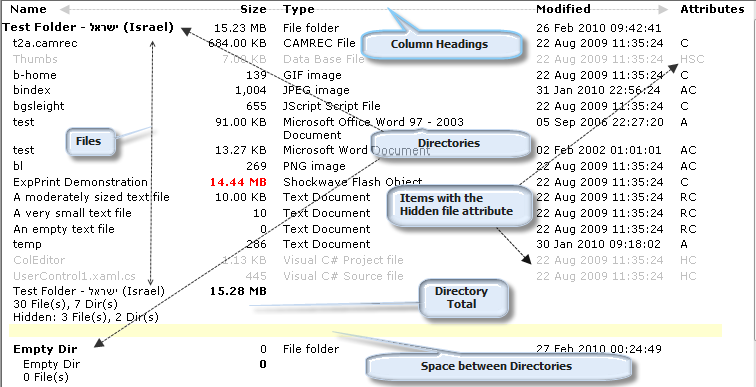
The following diagram illustrates the sections of a listing that can be hidden using the options on this page.
1 Note that the option here to hide items with the hidden file attribute is subtly different than using the "Hidden Items - Not Displayed" style sheet. This option eliminates the hidden items from the HTML output while the "Hidden Items - Not Displayed" style sheet instructs your browser to not display them. The visible result is the same, but if you import the HTML file into an application such as Excel, the non-displayed hidden items would be apparent. Additionally, if you use one of the colour styles that produces alternating colours, where hidden files are interspersed with non-hidden ones, the alternating colours will break due to the non-visible items.
See the Example Listing Formats for an example using the Hide Options to create a directory tree listing.
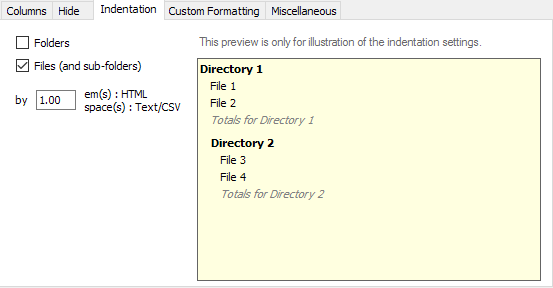
This page allows you to:
For HTML output, the indent width is expressed in em units so that it scales in proportion with the font size. You can use fractional values, such as 1.5.
For CSV and plain text output, the indent width is the number of spaces, fractional values are rounded down to an integer value, so a value of 2.9 results in 2 spaces for each indent level.
The preview panel will give you an illustration of the effects of these settings.
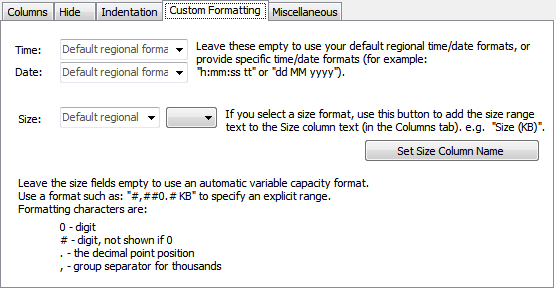
This page allows you to:
If you want to override your default regional format, enter a suitable Windows time format (e.g. HH:mm:ss), otherwise leave this empty. If you don't want to see the time, enter a space.
If you want to override your default regional format, enter a suitable Windows date format (e.g. dd/MM/yyyy), otherwise leave this empty.
If you leave this setting empty, ExpPrint will use a condensed display format that shows the file size in the most applicable units. For example, a file that's larger than 1GB will be shown as GB, while a file that's larger than 1KB but less than a 1MB will be shown as KB.
If you'd prefer all files to be shown with a consistent scaling, you can use a format pattern and specify the scaling. For example, if you want to show all files as KB, you can use a Size Format of "#,##0.## KB" (leave off the quotes), and set the scaling combo box to KB.
For a fuller explanation of the size formatting, see the description of the XSLT format-number function.
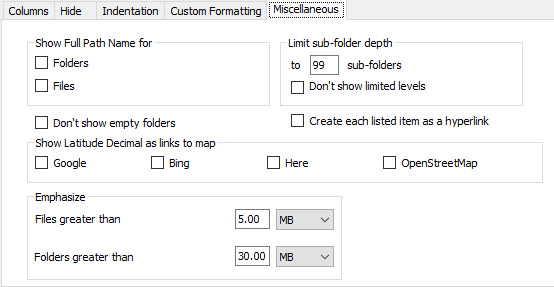
This page allows you to:
If you enable these options, the Name column shows the fully qualified path name of the file or folder.
If you only want to show the top levels of a deeply nested folder structure, you can set the number of levels here. To indicate that there are further unlisted sub-folders, ExpPrint displays the folder name of the first truncated level of folders along with an indicator, however if you don't want to see these levels, just set the "Don't show limited levels" option.
The default indicator adds the text "[limited]" to the folder name. If you don't like this, you can add your own style sheet to override the default (defined in the DefaultTableBaseCss.csd style sheet file - it's the tr.NotExp item).
You might find this option useful if you've created a filtered listing that results in many sub-folders with no files of the type you've created the listing for. This option removes all such folders from the final listing. However, because of the removal of these empty folders you might then be unaware of further sub-directory paths - in which case the "Show Full Path Name for" Folders option will ensure you can see the full path of the sub-folders.
If you enable any of these options and the listing for a file has the System.GPS.LatitudeDecimal (and System.GPS.LongitudeDecimal) metadata properties, the HTML listing will contain hyperlinks to the selected online mapping services.
Most photos taken with a mobile phone will have this data unless you've disabled it. Note that you will probably need to enable the "best effort" option when generating the listing in order to extract these properties. Here's an example of what you'll see with all 4 options set. Clicking the links will open a new page in your browser centered on the location.

If you create a CSV or text listing with map links, we recommend that you only use a single map service - the format produced is tailored for CSV usage with Microsoft Excel and only produces valid hyperlinks when a single service is chosen.
These options set the size of files and folders where emphasis is applied in the listing.
If you'd prefer something other than the default bold red emphasis, you can add your own style sheet to override it. The default is defined in the DefaultTableBaseCss.csd style sheet file (it's the tr.Hi item).
Once you've got the options set to get the best results with your application, use the Save Settings option so that you can quickly select them again.
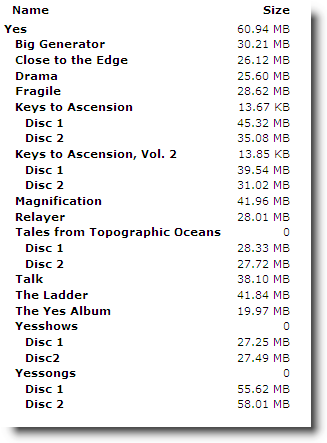
On the Hide Options page, if you hide the following items:
You can create folder "tree" listings like this.
Music/CD listings often show the tracks with the following information:
| Track Number | Track Title | Track Time |
This is easy to do with ExpPrint.
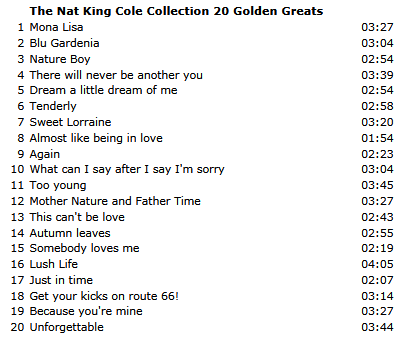
You'll get a listing something like this:
Don't forget, once you've got the settings how you like them, use the "Save Settings..." button to save these settings. Thereafter you can quickly select them from the "Choose Settings" list.
If you chose the Multi-Column layout from the ExpPrint Listing Viewer, you'll now see:
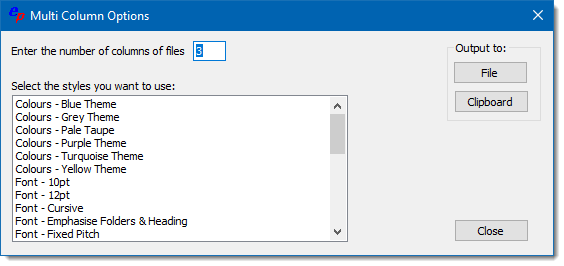
The multi-column options are:
Note that you can select any combination of styles, however you should only select one of each category as the last one will override any prior ones.
From ExpPrint V6.2 onwards, you'll need to pre/postfix any custom CSS files you have with the following cryptic lines:
<!--/*--><root><![CDATA[
Your normal CSS here...
></root><!--*/-->
This is needed to work around limitations in the XSLT V1.0 processing (included documents must be XML). It works by making your CSS files appear to the XSLT processor as XML but with the end result of just in-lining the CSS into the HTML document.
For example, here's one of the simple CSS files supplied with ExpPrint:
<!--/*--><root><![CDATA[
body,table { font-size: 12pt }
]]></root><!--*/-->
If you do not pre/postfix your custom CSS files, when ExpPrint tries to use them, it'll report an error like this:
---------------------------
Detailed Table Options
---------------------------
System.Xml.Xsl.XslTransformException: An error occurred while loading document 'file:///C:/Program Files/JD Design/ExpPrint/Plugins/Your Custom File Name.css'.
See InnerException for a complete description of the error. --->
... loads more information...
Classic mode is deprecated and not available by default. Please contact us by email if you need to enable this mode.
The classic ExpPrint dialog box lets you configure a single default set of settings. Note that an unregistered version does not let you save or restore any settings, and prints an evaluation banner on the page footer.
A common use of this mode was to output listings to plain text files for import into other applications such as Microsoft Excel. As most modern applications support importing HTML, you can often select the HTML listing in your web browser, use your browser's Copy to clipboard facility, and then Paste the listing into the other application. For situations where the HTML listing is not a good choice (many browsers perform poorly with very large files), the "Text (csv) Detailed Table" layout will output a CSV file that many applications will be able to import.
If you can use the SharePoint facility to "Open with Explorer" or "Windows Explorer View" to see your SharePoint library in Windows Explorer, you can use ExpPrint to obtain a listing of it the same way as for any other folder in Windows Explorer.
Because there are so many cloud storage providers, it's not possible to test them all. These notes are generic and will probably apply to all such services that behave in similar ways.
Depending on the implementation of the cloud storage system, the results you obtain with ExpPrint can differ.
Systems that behave like OneDrive, which maintain a small local proxy file for the full file stored in the cloud won't have all the file properties that are available in the full file. However, if you choose any of the file hash options, this requires reading the entire file which will likely cause the underlying service to fetch the file from cloud storage. Doing so is likely to be very slow but will allow ExpPrint to extract the full set of properties.
Google Backup and Sync on the other hand, only has the ability to store a full local copy of files. Once the file is synchronized, ExpPrint will be able to extract the full set of properties from the file.
The easiest way to register is by credit or debit card and the secure online payment providers available from our web site.
 Once you've made the payment, we'll email your registration
key to
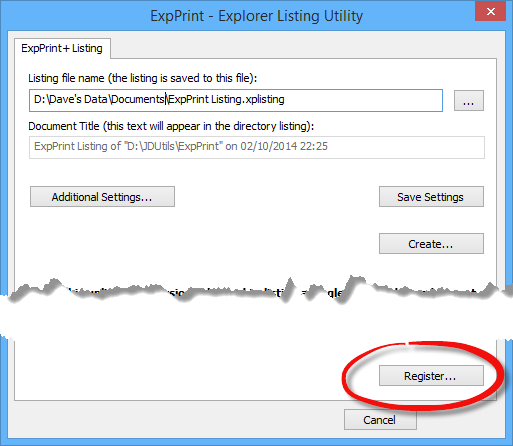
you as soon as possible. When you receive your registration key, access
the About dialog from the main
ExpPrint dialog "Register" button shown here:
Once you've made the payment, we'll email your registration
key to
you as soon as possible. When you receive your registration key, access
the About dialog from the main
ExpPrint dialog "Register" button shown here:
 This
will show the following dialog where you can paste your received registration key into the entry field.
This
will show the following dialog where you can paste your received registration key into the entry field.
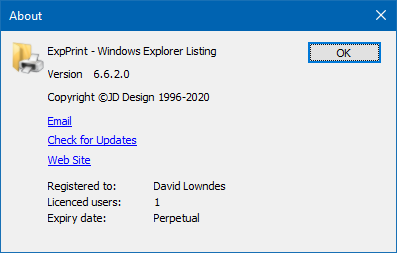 After
closing and re-opening the main dialog, you can check that registration has worked by re-displaying the About box. When the product is successfully registered, what was the
"Register" button on the main dialog will now be labeled "About", and your registration
details are now displayed in the About dialog.
After
closing and re-opening the main dialog, you can check that registration has worked by re-displaying the About box. When the product is successfully registered, what was the
"Register" button on the main dialog will now be labeled "About", and your registration
details are now displayed in the About dialog.
As always, if there's something you'd like to see in a future version, don't hesitate to email us and let us know.
Use Settings, Apps, Apps and features (Control Panel, Programs and Features for older versions of Windows) and choose the ExpPrint item.
We maintain a list of frequently asked questions on our web site. If you have a technical question, please check there to see if you can find an answer before contacting us by email.
We will post the latest versions of our utilities on our web site as soon as they are available, so please take a look there and subscribe to our RSS feed to keep up to date with the latest version.
If you have any suggestions for improvements to any of our utilities, please contact us via email (see our web site for contact information). It's always good to hear from people using our products, and we appreciate you taking the time to tell us.
Thanks
JD Design